


Last month I shared this Canvas Photo Transfer tutorial over at Lolly Jane (aren't those sisters cute?!), and today I'm sharing it here in case you missed it. This is such a fun tutorial for easy artwork using your personal images and a home printer!
My baby girl turned one in February (of course, I shared all the "tweet" birthday details with you!) and I wanted to display one of the photos from her 1 year photo shoot. I remember seeing this tutorial on A Beautiful Mess awhile back, so I decided to give it a whirl. I love the way it turned out!
Basically, to create a canvas transfer, you take a printed copy of a photograph (see note at end of post!) and, using a gel medium, transfer that image to a blank canvas. Due to the method of transfer, your image takes on a beautifully aged appearance.
To start this process, you'll need:
a plain canvas
a paint brush
scissors
water
gel medium (I used Liquitex- Matte Super Heavy Gel from Hobby Lobby- don't forget your 40% off coupon!)
a home printed image on regular printer paper**
**please note, the original image has my daughter facing the other way. In my haste, I forgot to tell my printer to print a mirror image. Don't skip this step, especially if your image has words in it!
1) Gather your supplies, print a MIRROR image copy of your photograph and trim the border from that image
2) Paint a generous amount of the gel medium over the entire canvas surface
3) Press a copy of the photo, image side DOWN, onto the canvas, making sure to center it and then smooth out any bubbles or wrinkles. Then...walk away for 6 or more hours before going on to step 4!
4) After 6+ hours, sprinkle your canvas with water (I just used my finger tips to do this, but a water bottle would have been even better!) and begin rubbing the paper from the canvas, leaving the image on the canvas. This is the trickiest part of the entire process! Be extra gentle as your rub and peel the paper from the canvas.
**A few tips: Do NOT over-wet your canvas or over-rub one area. The spot in the lower right corner is where I used way too much water and the brown blur in the top left hand corner is a spot where I rubbed too aggressively. Learn from my mistakes! Also, be especially careful over faces. It would be very easy to distort the face by excessively rubbing. Imagine your cutie pie with only one eyebrow or no nose. Yikes! Be extra delicate in that region.
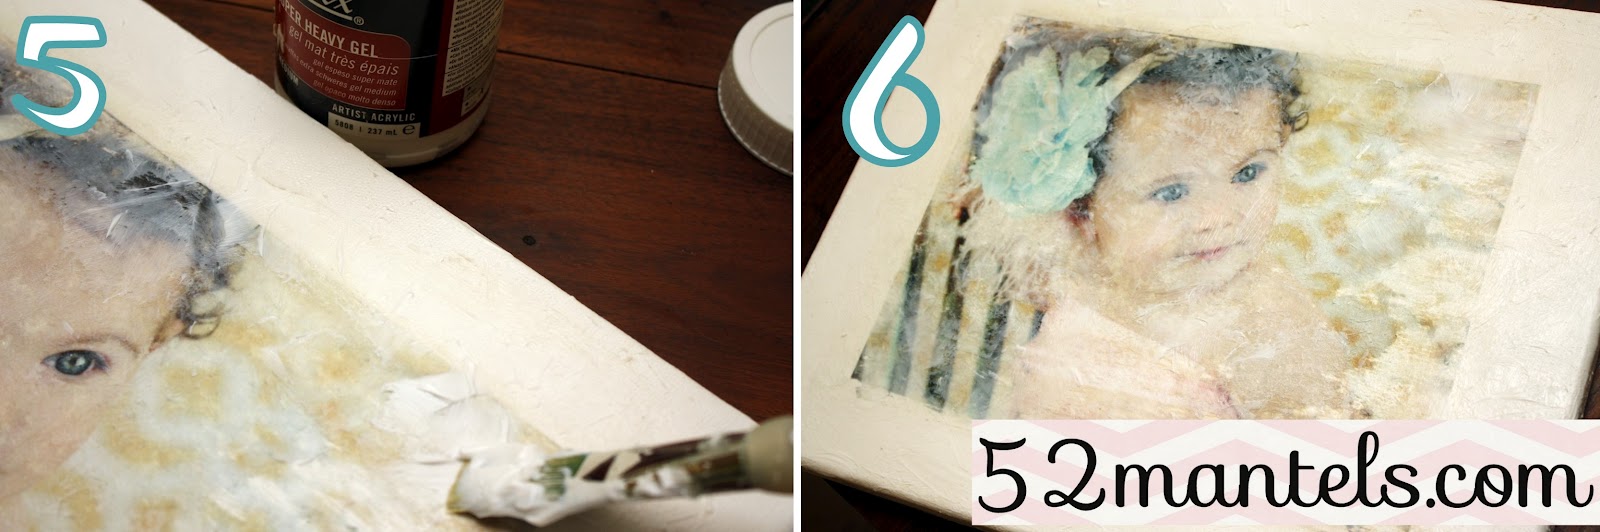
5) When the paper has been peeled from your canvas and the image is completely dry, paint a thin coat of the gel medium over the entire canvas. After the first coat dries, go over your canvas in short, back and forth strokes, leaving random peaks in the gel. This will add texture to the canvas and give it the look of a painting. The gel will go on white, but dry clear and matte.
This process might sound complicated, but it's really not! It's a lengthy project only because you must allow the gel to dry between steps. I started one evening, let it dry overnight and finished the next day. It was SO worth the time, though!
Got any cuties you'd like to put on a canvas??
Update: my initial tutorial said to use a laser printed copy of a photograph. That's what Elsie from A Beautiful Mess used. However, my hubby has recently informed me that our printer is an inkjet printer!! Ha! I'm such a dork. So, the moral of this story is that this process appears to work with both laser printers and inkjet printers. Great to know!

(Like what you see? Follow 52 Mantels!)


 Follow 52 Mantels by Email
I link up here and here!
Very cute! I must give this a try!
ReplyDeleteI'm a new follower! :)
I really like how it looks a little worn. Great tutorial.
ReplyDeleteOh my goodness this turned out looking awesome!!
ReplyDeleteThat looks great! By the way, I LOVE the hook below the photo canvas!
ReplyDeleteThanks for sharing this tutorial. I've pinned it! Gorgeous, gorgeous picture of your cutie pie, by the way!
ReplyDeletePinned this tutorial. Now I just need an adorable picture of an adorable baby girl!
ReplyDelete~Bliss~
Lovely art treatment.
ReplyDeleteThis looks like a great idea. Yours turned out beautifully -- well, you certainly had an adorable subject!
ReplyDeleteCAS
Emily, this is gorgeous! Just gorgeous!
ReplyDeletecan you use mod podge on this or do I need the gel medium?
ReplyDeleteits very wonderful!. I will do it also .. :)
ReplyDeleteCanvas photo
This looks great, I live in Israel, so will have to find the translation for the special gel though. Wish me luck :-)
ReplyDeleteI love how this turned out & thanks for the tutorial. Your little girl is gorgeous :)
ReplyDeleteThis is great! Do you think it would work on a wood surface? Do you think mod podge would work?
ReplyDeletecheap nba jerseys
ReplyDeletemichael kors handbags
borse gucci
coach outlet
mulberry handbags
michael kors outlet
louis vuitton uk
louis vuitton outlet
christian louboutin shoes
nike roshe
chanyuan2017.01.10
chicago bears jerseys
ReplyDeleteversace shoes
jordan shoes
christian louboutin outlet
nike huarache
michael kors handbags wholesale
nike air huarache
buffalo bills jerseys
chiefs jersey
moncler outlet
coach outlet online
ReplyDeletechristian louboutin
red bottom
polo ralph lauren outlet
polo ralph lauren outlet online
michael kors
michael kors outlet online
tods outlet
pandora charms sale clearance
ralph lauren sale clearance uk
0413shizhong
chaussures louboutin discount
ReplyDeletetalons louboutin femme pas cher
louboutin pas cher en ligne
talons louboutin prix
chaussures louboutin pas cher
talons louboutin
christian louboutin
chaussure louboutin femme
louboutin dorothy pas cher
louboutin homme solde
louboutin femme pas cher
louboutin pas cher france
chaussures louboutin dégriffées
hauteur talon 4.25 po
basket louboutin homme
louboutin pas cher
basket louboutin femme
louboutin pas cher 2017
escarpin louboutin pas cher
talons louboutin femme
chaussure louboutin solde
louboutin chaussures
basket louboutin pas cher
hauteur talon louboutin
louboutin pas cher femme
chaussures louboutin soldes
louboutin pas cher chine
chaussure a talon haut pas cher
chaussure a talon femme
chaussure a talon pas cher
louboutin femme solde
escarpins talons hauts
louboutin femme talon
louboutin homme chaussure
basket louboutin
louboutin pas cher homme
hauteur talon 5.5 pouces
Doudoune Moncler
ReplyDeletemanteau long moncler femme
blouson moncler homme
Moncler Pas Cher
blouson parka moncler femme
gilet moncler pas cher
veste fourrure moncler femme
doudoune moncler homme
veste moncler homme
doudoune moncler pas cher
manteau long moncler homme
doudoune moncler femme
gilet moncler femme
gilet moncler homme
doudoune moncler solde
vest moncler femme
veste moncler pas cher
veste moncler homme pas cher
veste moncler
gilet moncler solde
cc0127
ReplyDeletesupreme clothing
coach outlet
fitflops sale clearance
uggs
cheap ray bans
pandora store
pandora charms
moncler outlet
coach factory outlet
coach factory outlet online
cc0127
By incorporating van der Waals (vdW) Cheap Nike Air Force 1 interactions between the CO2 molecule and the surfaces, we find that CO2 binds more strongly on these multilayer structures. Furthermore, there is a slight discrepancy in the binding energies of CO2 adsorption on the heterostructures (GMoS2, MoS2G) due to the modality of the atom Jordan Shoes For Sale arrangement (C "Mo "S "O and Mo "S "O "C) in both structures, indicating that conformational anisotropy determines Cheap Yeezy Shoes Sale Coach Bags Clearance to a certain degree its CO2 adsorption energy. Meanwhile, Bader charge analysis shows that the interaction between CO2 and these surfaces causes charge transfer and redistributions.
ReplyDeleteSecurity incidents such as targeted distributed denial of service (DDoS) attacks on power grids and hacking of New Air Jordan Shoes factory Nike Air Force 1 Cheap Outlet industrial control systems (ICS) are on the increase. This paper unpacks where emerging security risks lie for the Ray Ban Outlet industrial internet of things, drawing on both technical and regulatory MK Outlet perspectives. Legal changes are being ushered by the European Union (EU) Network and Information Security (NIS) Directive 2016 and the General Data Protection Regulation 2016 (GDPR) (both to be enforced from May 2018).