


Over the past year, I've SLOWLY been working on my craft room/guest room. And, today's tutorial, an easy framed cork board, is my newest craft room addition. Every little bit, I make small changes to the space, so I haven't been ready for a big "reveal". BUT...the reveal is FINALLY coming in the next couple of weeks. One project left, and I'm calling it done! Stay tuned for that :).

This project started when I received a fun package in the mail from Elmer's and X-ACTO, with products to try out. This gripster X-ACTO knife and self-healing mat plus cork foam board, to be exact. I've never used the cork foam board, but it is SO COOL. The cork isn't flimsy like other cork products and it cuts easily with an x-acto knife. Plus, the sheets are really big (20x30"). I decided to cut a 11x14 piece to fit into a frame I had in my stash.
Seriously, the longest part of this tutorial is the painting steps. If you have a frame that doesn't need painting, and, if you don't paint the cork, you can have a framed cork board in about 10 minutes!!
I decided to paint my frame and the cork itself (it paints beautifully!), so here's my tutorial:
Framed Cork Board
Supplies:
cork foam board
open-back frame
yard stick
measuring tape
pen
X-ACTO knife
self-healing mat
*paint for frame (I used Sonora Rose by Valspar)
*paintbrushes
*painters tape
*paint for cork
*optional supplies if you're painting the frame and/or cork

To cut your cork board: 1) measure the inside of the frame to verify the opening size 2) mark the backside of the cork with the measurements 3) cut a straight line with the X-ACTO knife, using the yardstick to stabilize (do this step on top of the self-healing mat) 4) remove the cork piece
If you're using a frame that doesn't require a paint job, simply slip the cork into the frame and you're done!!
To continue with the painting....

1) Paint your frame (Mine was primed white several months ago. And, that's as far as I'd gotten! I painted two coats of my coral paint) 2) Place painter's tape in random stripes on the cork 3) Lightly paint over the stripes with a foam roller brush (I kept the paint light and uneven, but you could do a solid coat, if desired) 4) Peel the tape off when the paint is still wet
When everything is dry, slip the cork board into the frame! Mine fit perfectly and is held in place with the metal clips on the back of the frame. This cork board is the exact depth of my frame. Perfect!

I hung mine in my craft room, and then realized I didn't have any cute pushpins. SO, I have another short tutorial for you:
Easy Decorative Pushpins
Supplies:
plain pushpins
decorative brads (in the scrapbook section of your local craft store)
hot glue and hot glue gun
scissors
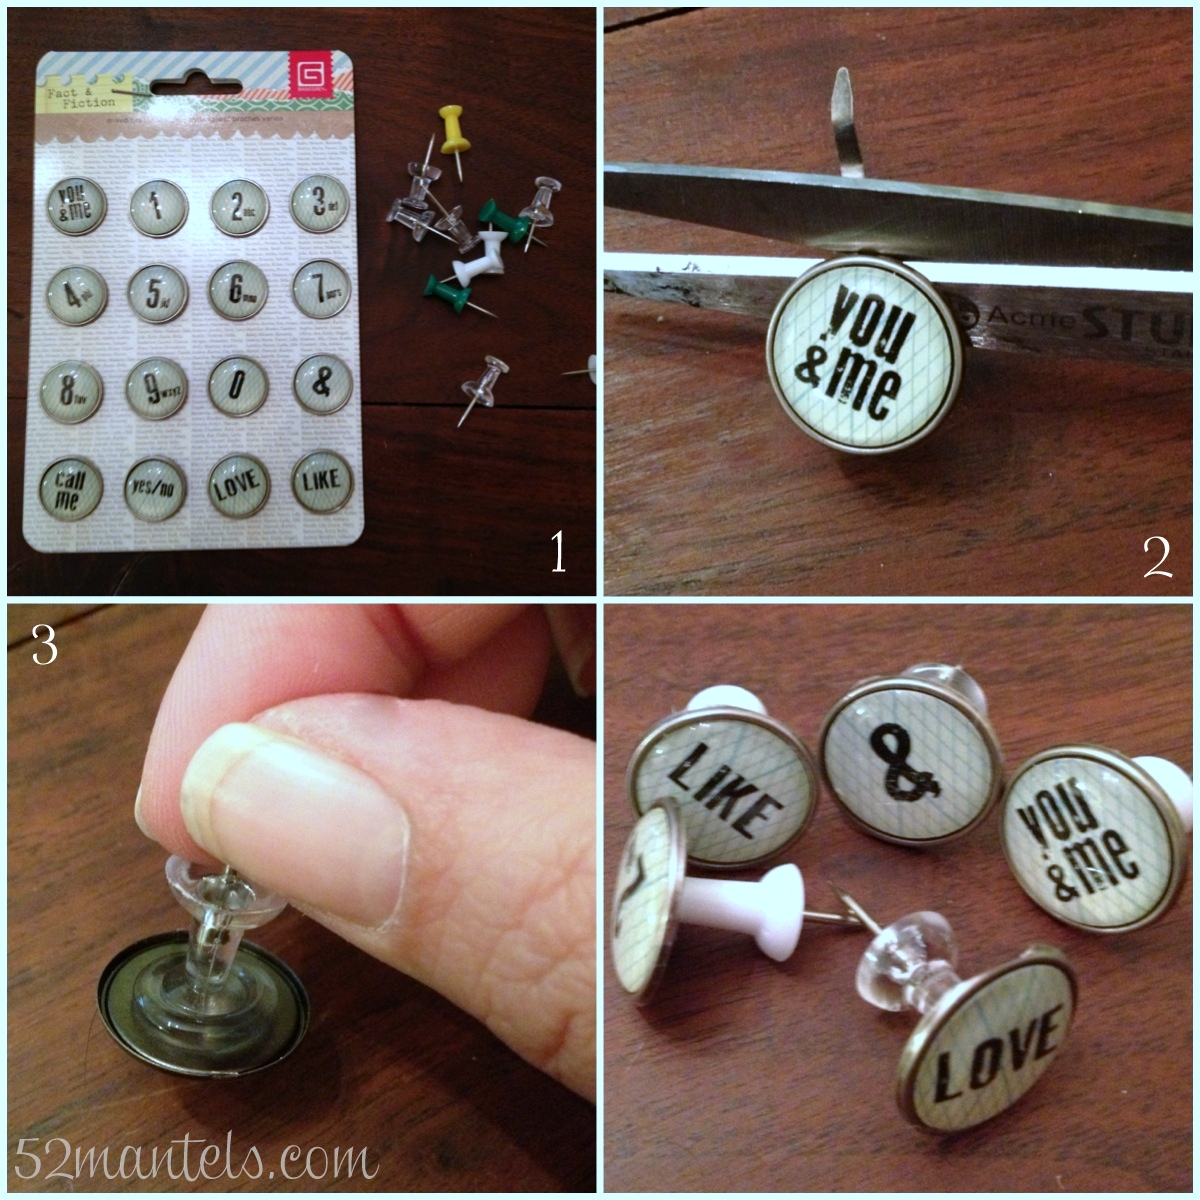
1) gather your supplies 2) remove the brad "arms" with scissors 3) place a dollop of hot glue on the backside of each brad and place your pushpin into it 4) repeat until you have a nice collection!

That's that! I hung mine on the side of my sewing cabinet with Scotch heavy duty fasteners. Because the foam is so lightweight and the frame is sans glass/backing/etc, this cork board is really light.
This project would be great in an office or dorm room...or even, in a smaller frame, inside of a locker. You know, Summer is winding down, we have to start thinking about these back-to-school things :).
Let me know if you try out this cork foam board. I'd love to see what you do with it!
**I received product to review from Elmer's and X-ACTO, but all opinions in this post are 100% mine.
Happy Friday!

Like what you see? Follow 52 Mantels!
 |
 |
 |
 |
 |
I love this Emily! The random stripes are awesome and the frame and push pins are so cute!
ReplyDeleteKrista
Thanks so much, Krista! You are too kind :)
DeleteOkay, so I am a new follower and I have been on your site for maybe one minute and I already love it!
ReplyDeleteYour tutorials are awesome!
Love and Blessings,
Lace
www.chosentheblog.com
Aw, thanks Lacy!! Thanks for stopping by!! :)
DeleteYour corkboard is super cute, Emily. Great project!
ReplyDeleteThanks, Sharon!! :)
DeleteThat is very cute!
ReplyDeleteThanks Mom! :)
DeleteLove, love, love this!! I love how you put it in a frame and painted striped pattern on the cork board. Love it!! Pinned it!!
ReplyDeleteThanks Crystal!! You are always so sweet to me! :)
DeleteI am so HAPPY I found you. Great fresh ideas!
ReplyDeleteAw, thanks Vanessa! Thanks for stopping by!!
DeleteWhee did you get the fun curtains or will that be part of the reveal?
ReplyDeleteHi Kelly! Thanks for coming by! The curtains are from ikea! I will definitely share all the details when I do the reveal. But, yes, ikea curtains! :)
DeleteI love it! It must be framed corkboard week because I have one drying sitting right next to me:)
ReplyDeleteTake care,
Trish
Super cool project! Love it, Emily!Thanks for sharing the great tutorial.
ReplyDeleteHave a fabulous day!
Hugs from Portugal,
Ana Love Craft
www.lovecraft2012.blogspot.com
Super cute, Em :) I've been using the cork foam board for some of my photo styling for awhile now. LOVE IT! xo
ReplyDeleteI've been dying to try that cork foam board - what a fun project! I have a couple big frames that need to be painted and "cork-ed" ;)
ReplyDeletereplica watches
ReplyDeletelouis vuitton sacs
steelers jerseys
lebron james shoes
adidas nmd
michael kors outlet
raiders jerseys
bengals jersey
michael kors handbags
nike blazer pas cher
Enter your subtle elements into an awful credit database which may restrict your ability to money/compose a check for business purposes.
ReplyDeleteThese activities are very useful for us and through these, we can improve our knowledge and abilities. We should manage such kind of activities and get benefits. Dissertation writing services.
ReplyDeleteMenuJonathan "Rusty" Tucker grew up in Birmingham Crestwood neighborhood and went to culinary school at Johnson Wales University in Charlotte. At 24, he discovered barbecue was his calling, and he opened Rusty Bar B Q in Leeds in 2009. Ena was born in 1924 at Drumblair House, near Forgue, and grew up in Huntly, Aberdeenshire. She had ambitions to become an artist, but the Second World War put an end to these hopes. Liquor Control Director Glenn Mukai reported his salary of $132,432 and receiving stock dividends from Hawaiian Electric facebook.com Industries worth between $1,000 to $9,999. He jointly owns 1,126 common shares, 463 common shares held under joint tenant and 663 common home shares held under trust with Hawaiian Electric Industries. The study focuses on the main factors that influenced the outcomes of BPR projects undertaken by Saudi Airlines.It was concluded that a lack of management support, the absence of clear strategic plans, the storesmkoutlet failure to invest in information technology, ignorance of the human factor, and bureaucracy have had a significantly negative impact on BPR initiatives in Saudi Airlines.This study is of great interest to those organizations which are considering undertaking BPR. Before undertaking BPR projects, organizations ought to closely consider both the enablers and challenges of BPR.
ReplyDelete