November 30, 2011

Paper Tree Inspired By Anthro


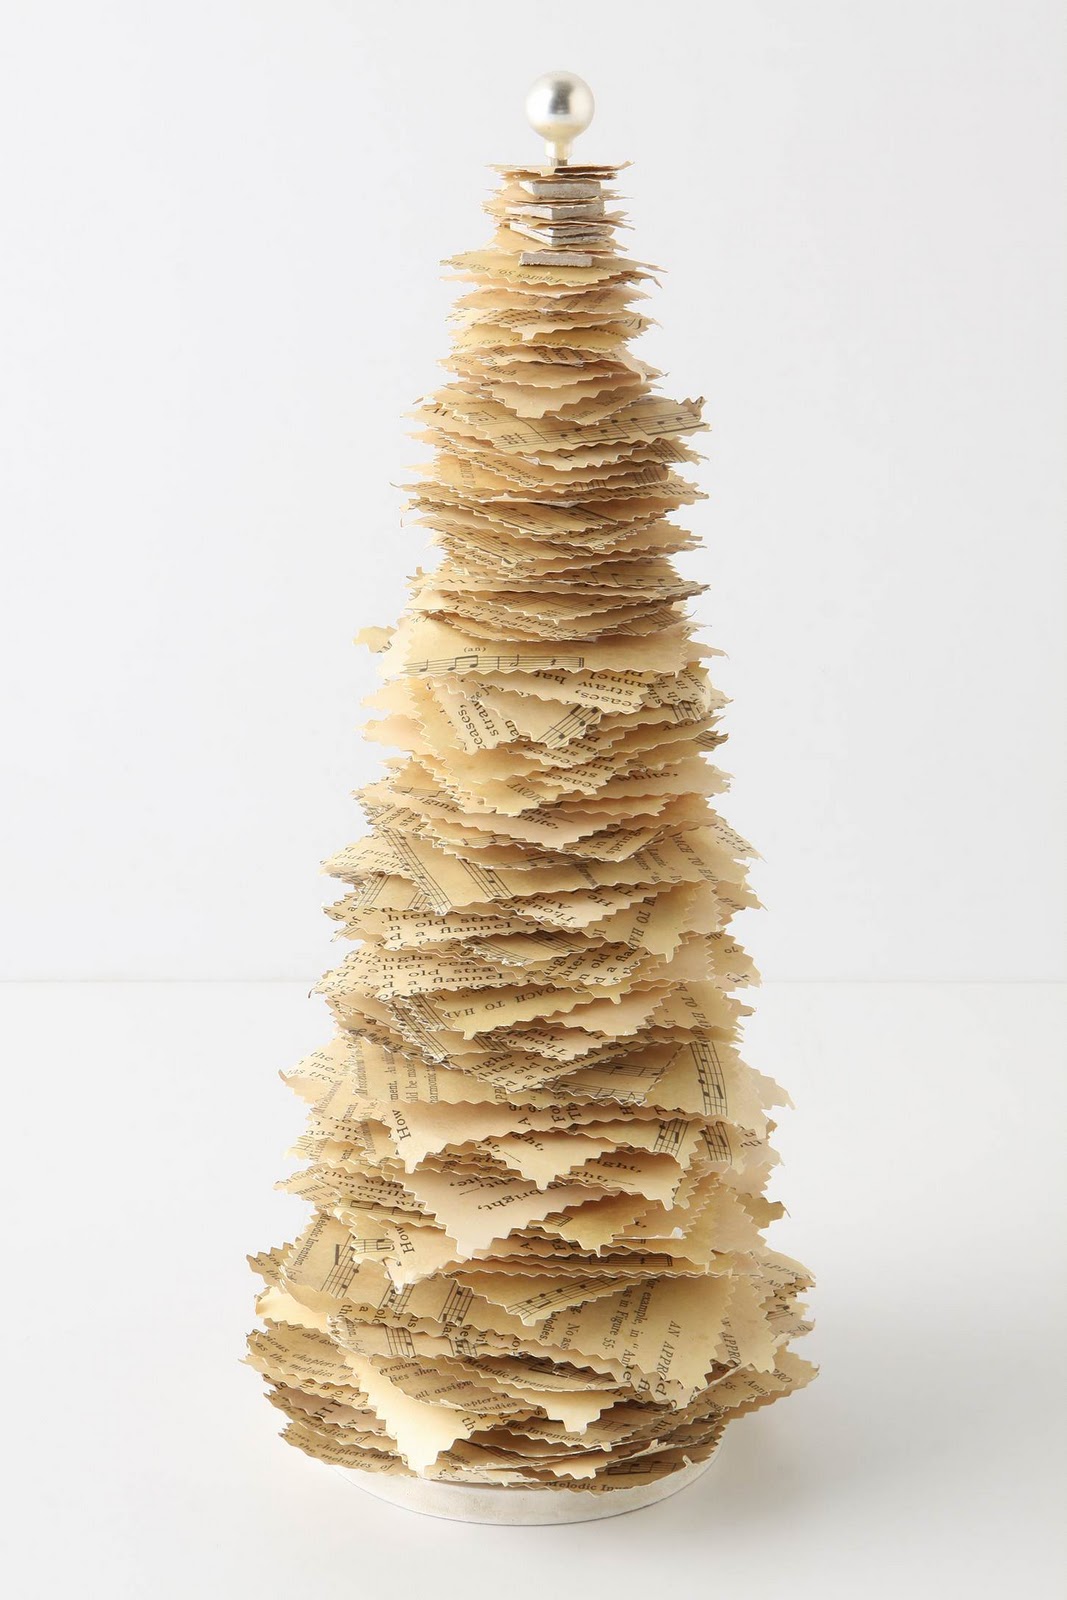
Recently I popped into Anthropologie to check out their Christmas lovelies. My monthly lovelies budget was pretty tapped, so I didn't go home with anything. But, while there I spotted a 13" Christmas tree made from printed paper. So, cute, but at $48? No way that lovely was going home with me. 


Instead, I decided to make my own version.


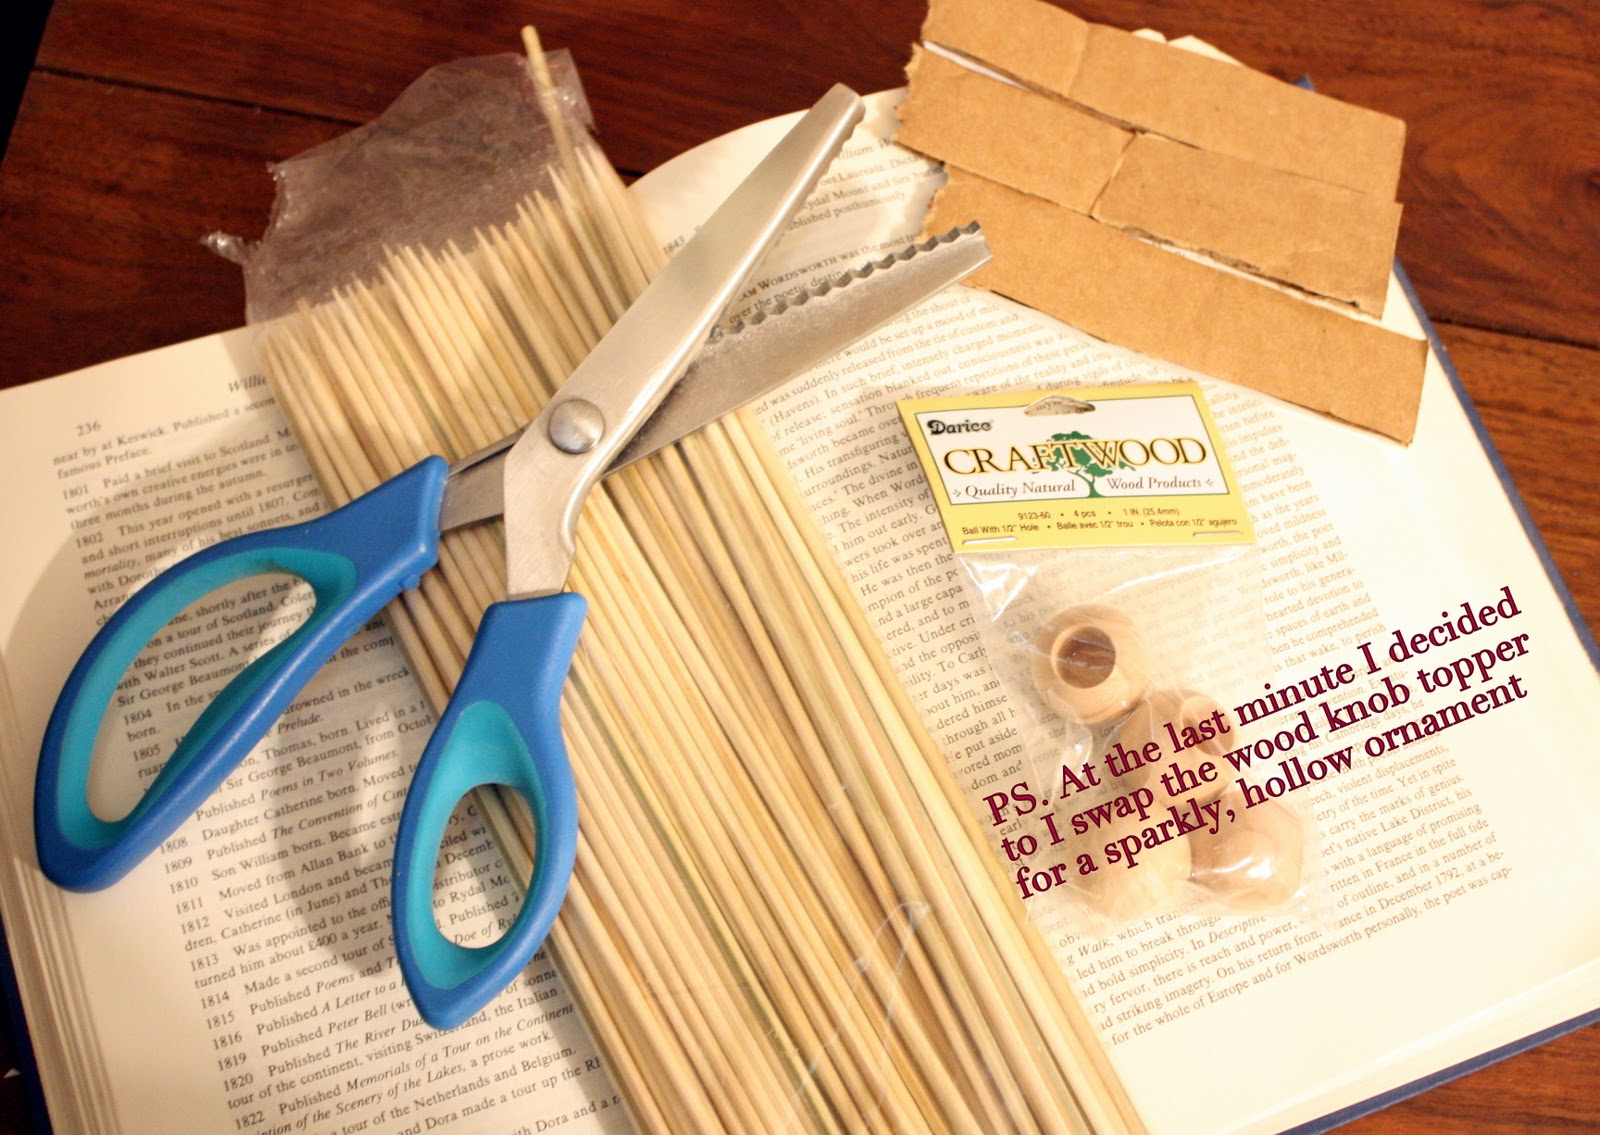
I started with an old book, my pinking shears, cardboard scraps (cut from a big diaper box) and a wooden skewer.  Initially I was going to use a wooden knob for the topper, but I changed my mind and used a sparkly ornament. 


I then removed a stack of pages and cut them into varying sized squares. No need to measure, just wing it. Start with large squares and get progressively smaller.


I decided that I wanted the base of my tree to be a canning jar because...that would be seriously cute, right? So, I hot-glued a cardboard square to the rim of the lid and added a small hole to the center to poke my skewer through.


I then started layering a few paper squares at a time, followed by a small (1x1 inch) square of cardboard and then more paper.

Make sense?

The small cardboard pieces just separate the layers a bit. Sometimes I layered two in a row and sometimes just a single piece.

I'm a very relaxed crafter.

If you haven't figured that out by now. 


Keep layering until you fill the skewer. 


 When I had my tree stacked, I glued the bottom of the tree to my cardboard/lid base.


And, that's pretty much it! You're ready to fill your jar with whatever you fancy and screw on the lidded tree. I added a small, sparkly ornament to the top with a bit of hot glue.

Note: If your tree is wobbly, add a chunk of styrofoam to your jar and then fill around that. The skewer will poke into the styrofoam and stabilize the tree. I filled my jar with aqua yarn and that wasn't sturdy enough to hold my tree steady.


Of course, mine has already floated around my house a bit. My decor is constantly wandering from room to room.

I'm so fickle.

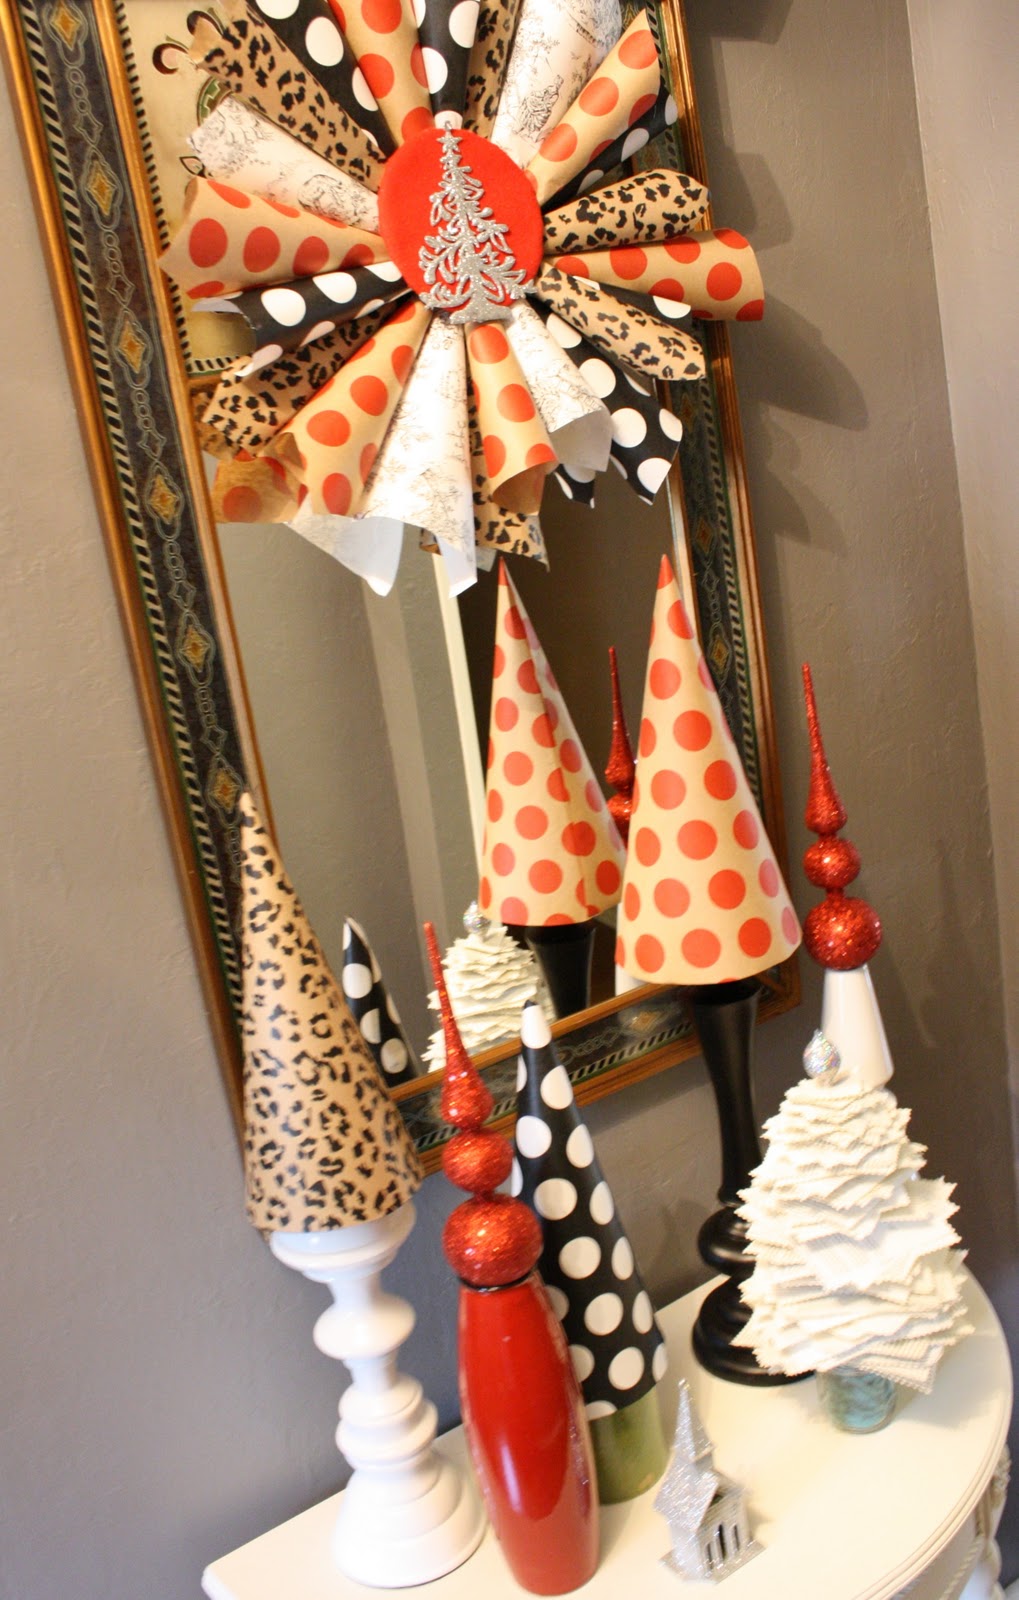
Speaking of fickle? I've already changed my Christmas theme this year. I just didn't have enough stuff to really work Mod Lodge so I decided to take away the green deer paper we discussed last week and added black/white and aqua.

I know, I know. Fickle! But, I think I'm set with this new theme now. It shall be called:

I'm dreaming of a green red aqua gold silver brown black cream white Christmas. 


Rolls right off the tongue.


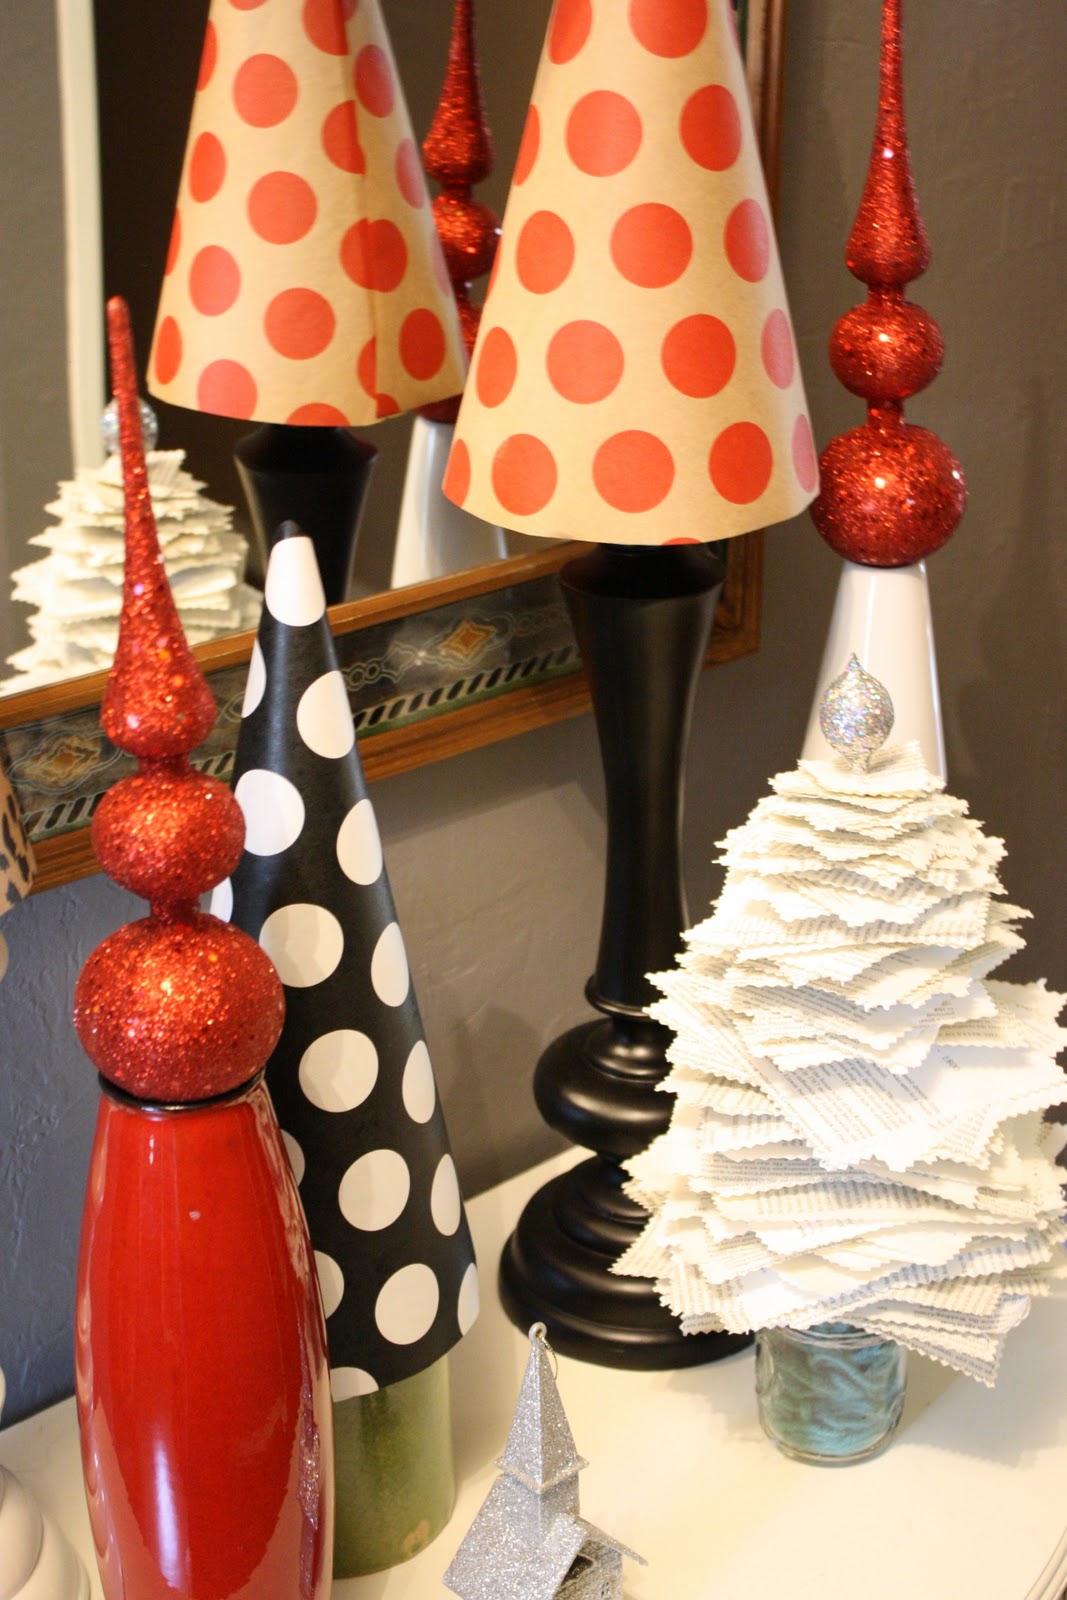
Well, hello little forest of paper trees. Welcome to my crazy Christmas tree collection


Photobucket

November 28, 2011

Joy to the World Mantel!


Thanksgiving is behind us and there's nothing (I mean nothing) standing in the way of Christmas now! Feel free to glitter everything in sight. All in the name of Christmas cheer, of course.


Had you asked me last month if I collected a particular Christmas item, I would have said no. That is until I unpacked my Christmas tubs and uncovered the (roughly) seven billion Christmas trees I've amassed through the years.

Turns out I collect Christmas trees.

Glittered trees. Mercury glass trees. Sparkly trees. I must really like Christmas trees, or something.


This silver tray turned chalkboard has got to be the most versatile piece I have in my home. You may have also seen it used here as a Thanksgiving centerpiece base, a platter for caramel apple cake pops and as a staging prop for a recent necklace I made from antique hankies. I got it from my mom, who got it from a store at Canton Trade Days called Girls Gone Junkin

In case you were itchin' to know. 


I got this old window from my mother-in-law and it tends to float around my house a bit. It's been on a mantel before (remember?), it's been in my guest room and it's spent some time in my family room. But, it's never shouted JOY like it is this week! I used my Silhouette SD to cut the letters out from fun, festive, red vinyl.


And there, dear friends, is my first Christmas mantel of the season! And, you can even see my Christmas tree in the reflection.

It's the most wonderful time of the year!

(someone should totally write a song about that sentiment)

Photobucket

November 24, 2011

Easy Wrapping Paper Art


Today's project was teased yesterday when I showed you the tutorial for Wrapping Paper Christmas Tree Topiaries. And, guess what? It's another easy project!

In October, I made easy pumpkin art using scrapbook paper. This tree was inspired by that project. Go read all about it! 

I started my project by cutting a triangle out of poster board. I freehanded this, but feel free to use a straight-edge or a template. 

I'm not that into straight lines. Obviously. 


I used my scalloped circle hole puncher to cut lots of circles from my wrapping paper and pages from an old book. 


Starting from the bottom, I arranged lines of circles on my tree, glueing them as I went. I decided to do every other line out of the book print because...well, no reason. Just because. 


 Many lines later, I placed my final, red circle on the tree. That process took me a total of 7 minutes.

I found a sheet of woodgrain wrapping paper in my closet that I'd picked up at Paper Source last year. I think it's perfect for this project! I cut the paper to fit inside an old frame (minus the glass) and attached the tree to it using double-sided tape. I doubled up my double-sided tape to lift it off the woodgrain a bit.

And, that was that. Another 7 minutes gone. I love fast projects!!


I love these projects because A) they were super fast to complete B) they only cost me supplies from my closet and C) they can be 100% tailored to your own personal Christmas decor. Is your wrapping paper Silver and Gold? Blue and White? Turquoise and Red? Yep, those colors will work too.

See what I mean?! Perfectly tailorable!


I hope everyone is having a very happy Thanksgiving! Just as soon as you clear away the dishes, it'll be time to start decking the halls, trimming the trees and sprucing the mantels. It's the most wonderful time of the year! 
Photobucket

November 23, 2011

Wrapping Paper Christmas Tree Topiaries


Are you dying to know how I turned my wrapping paper into, what I like to call, Christmas Tree Topiaries?? Well, you've come to the right place, because I'm about to show you! 


But first...

Does anyone else pick out their wrapping paper first, before you even take the Christmas boxes out of the attic?? Then you may be my soul sister, because wrapping paper is one of my great loves.

Last year my Christmas themed was called A Holly Jolly Christmas** and I used red/white houndstooth and green/white polka dot plus a red, green and white floraly-stripey print. I loved it for it's unabashed festivity. 

(**Is it weird that I name my Christmas themes? Are you kind of embarrassed for me?)

(Well, look away, then, because I'm about to unload a bit more Christmas dork over here)

This year's theme is called Mod Lodge.  And, it'll be heavy on red plaid, natural textures and woodgrain. Because, I'm kind of into wood grain right now. 

Whew, that was a (needlessly?) long intro to this craft. 

Basically, I wanted to make some simple, low-cost decor for my front entry table. And, probably a future mantel. 

I came up with the idea to make wrapping paper Christmas tree cones and that evolved into the topiaries.

The hardest part of this project was making a good cone template. I googled this and looked at several dozen templates before finally free-handing my own. It's kind of like a large piece of pie with an added "love tag", which is what I call the flap that holds the ends together. It's a little trial and error, but once you get a good template cut from a sturdy paper (I chose poster board), keep it! 


I wanted my cones to be slightly different sizes, so I simply cut two of the cones a bit larger than my template. Just wing it. That's my motto.


Once you have your wrapping paper cut into a pie with a love tag, roll it into a cone and close it up using glue or double sided tape. Ta-da. SO simple!


Now, for the topiary stands.

Are you ready for this?

They started as:


Various candle sticks and a vase. I placed the cones on top of these items.That's it! No glueing, welding, sewing or sweating. Just placing. And, walking away.


EASY. Dontcha just love easy?


Did you notice my framed Christmas tree art? Well, I'm so glad you did because that tutorial is coming tomorrow. Here's a teaser: It's also easy. In fact, I did BOTH of these projects in one (short!) nap by lil' punkin. 


See you tomorrow! 

Oh! And, HAPPY THANKSGIVING!

Photobucket

November 21, 2011

Yo, Fall. It's Mantel Time.


I can't believe it's the week of Thanksgiving! Time flies by in a blink of mantels, doesn't it? I have so much to be thankful for and this time of year is perfect for reflection. I didn't participate in the 30 Thankful Days movement, but if I had to place all 30 days of thanksgiving into a single thought, I would say this: I am thankful to be His beloved. Because that simple truth is the genesis of every other truth in my life.


I made my simple paper art in about 3 minutes and afterwards thought well, golly E, that would have been a great tutorial to share. Sure wish you'd have taken pictures

Okay, so I don't really call myself E and I don't really have 3rd person conversations with myself. But, if I did, that's how it would go. One could assume, at least. 

But, alas, I have no photographs to show you. Perhaps I can just explain it: cut out words and a single heart shape. glue them to a piece of plain cardstock. handwrite "create in me a" to go with your "Thankful <3". step back and admire. 

That wasn't so bad, was it??


I got these letter scraps for $2 each at First Monday Canton Trade Days. I'll let you in on a bitty secret: the reverse side of the "fall" block has on it a cute letter j. So, no, I didn't buy letters to spell out the word YO. I bought letters to spell out Joy. But, I really liked how YO fit perfectly inside my metal basket, so I went with it. Sometimes there's a method to my madness and sometimes it's just madness.


Vases, sticks, pumpkins. You know the drill.


That top basket full o' pinecones was my dad's childhood bike basket. I love it with a love not typically given to bike baskets. When I took it from my parents garage, I used it to carry home some pinecones, also found in their garage (what don't they have in their garage??) . And, I will tell you that those pinecones have yet to leave that basket. They're just so very happy together, I couldn't possibly separate them.

Until Spring, that is. In Spring those cones will be evicted. Because, I'm tough like that.


Well, looky there, I'm using those lunch bag flowers again. You know once I make something, I stick with it. For. Ev. Er. I'm already plotting how I'm going to work these into my Christmas decor.

Let's be honest, it won't be hard. 

Happy, Thankful Thanksgiving, friends! I'll try to get a Christmas mantel together ASAP for next Monday. 

Photobucket I'm Linking Up

Ratings and Recommendations by outbrain